|
CLMS - Chicago Lodge Membership System Query Maker -Copying a Query and Customizing |

  
|
|
CLMS - Chicago Lodge Membership System Query Maker -Copying a Query and Customizing |
|
Copy and Customizing a Query
Keep in mind that when you create or copy queries each query is specific to one report. That means you cannot share queries between different reports even if they are basically the same. Name your queries with useful names.
Step 1
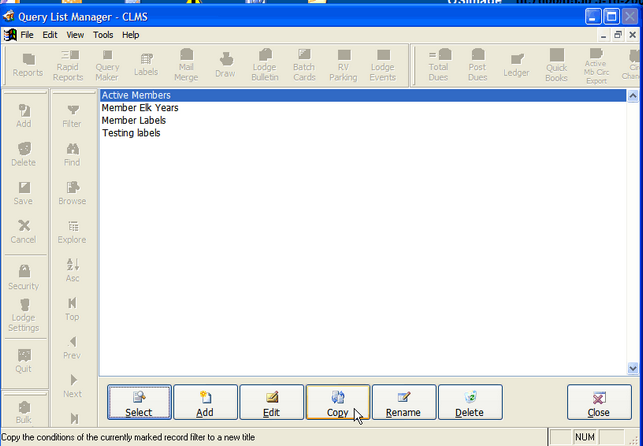
Lets make a copy of the "Active Members" query so that we can examine this queries's options and make changes to the copy without effecting the original query. Using your mouse select the "Active Members" query from the list then click the "Copy" button from the tool bar at the bottom of the screen.
Step 2
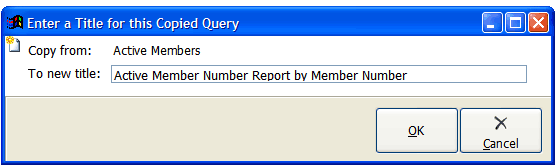
IMPORTANT: Query Maker works more like a report writer in that it each query is specific to the report that you create for it. Make sure to name your queries using descriptive meaningful names. An example would be creating a membership number list sorted by member number to be viewed on screen or printed, you may want to call this report something like "Member number Report by Member number".
In the "Enter a Title for this Copied Query" popup window enter a new name for the query the "To new title:" text box. We are calling this new query "Active Member Number Report by Member Number" a descriptive name.
Step 3
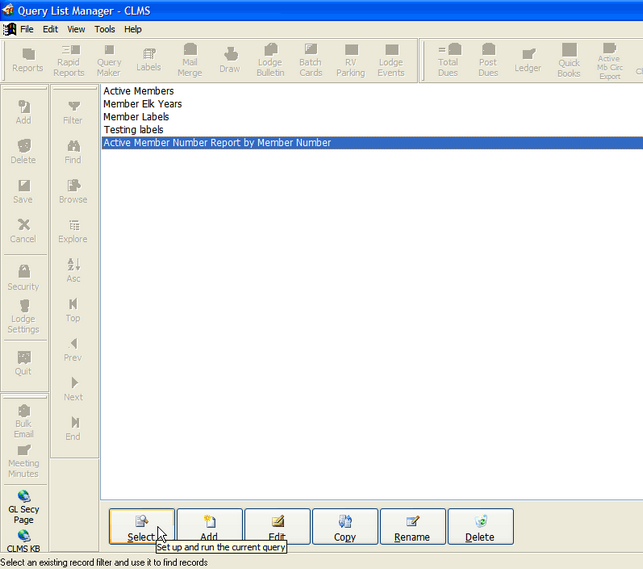
Using your mouse select the newly created query "Active Member Number Report by Member Number", then click the "Select" button so that we can see the options set for this query.
Step 4
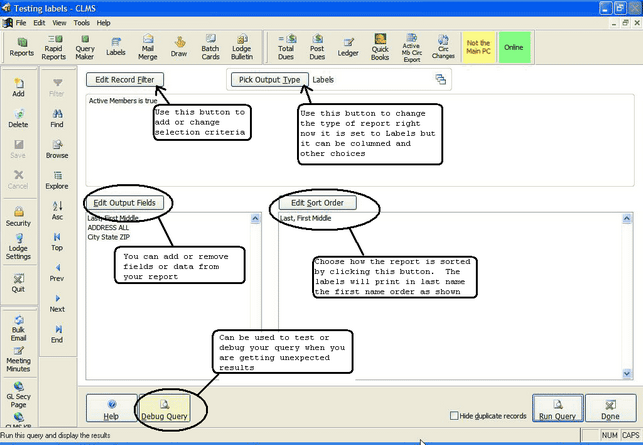
You will notice there several buttons located on the form that appears for the query we have selected. Of particular importance are the following
"Edit Record Filter" - Used to change the criteria for this query, for example which fields and what conditions are set for the fields of the query. In this example we will leave it set to select all active members.
"Pick Output Type" - You can change the format of the output of this query the default is columned style report. Other options are several other styled reports, Data tables for database output, ASCII text file formats and various Worksheet formats. We are going to leave it set as a columned report for this example.
"Edit Output Fields" - Where you can add or delete fields that you want as output for this query. We are going to add the member number field to this query's output.
"Edit Sort Order" - You can set how you want your output sorted. We are going to change the sort of this query to sort on Member number, so we can easily locate the highest member number.
"Debug Query" - You can use this to debug your query when you encounter unexpected results.
Step 5
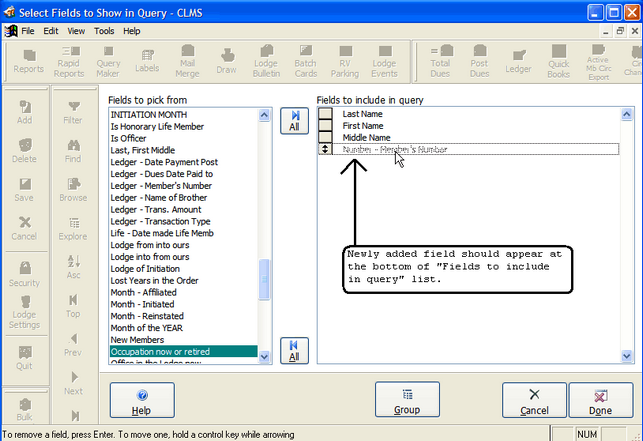
First lets add the member number to the output start by clicking the "Edit Output Fields", button. Then locate the "Number - Member's Number" from the Fields to pick from list on the left hand side of this form. Once you have located this field you can add it to the out put by double clicking on the field. It should then appear in the column on the right "Fields to include in query". Similarly you can double click on a field from the "Fields to include in query" list to remove a field from the query.

The member number will now appear at the bottom of the right hand list called "Fields to include in query". Click the "Done" button once you have finished adding any additional fields you want to have included. You will be returned to the previous screen.
Step 6
Now we will change the sort order of the output. We want the list to show up in member number order so that it will be easy to determine the highest membership number or even to scan for any gaps in member number sequence. Click the "Edit Sort Order" button.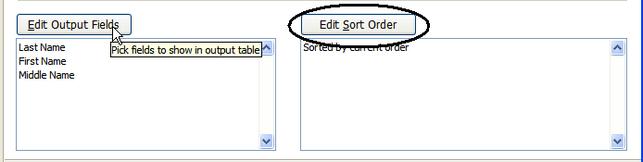
Step 7
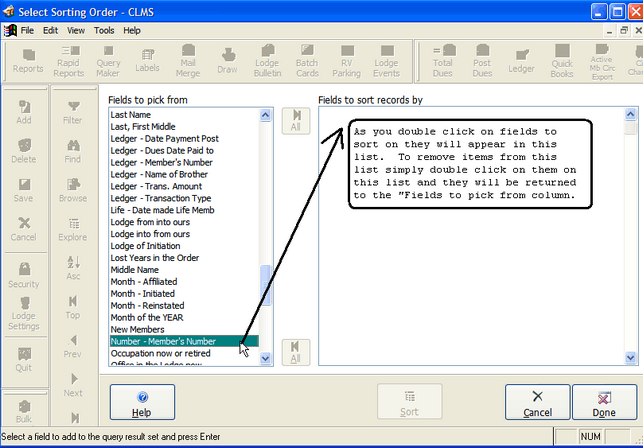
Another two columned form will appear, locate the field that you want to sort on. Keep in mind that you may want to sort on more than one field so it is possible to add more than one field the right hand column.
In the "Fields to pick from" column locate the "Number - Member's Number" field and double click it. This field will now appear in the "Fields to sort records by" column. Once you have completed adding all the fields you wish to sort on click the "Done" button.
Step 8
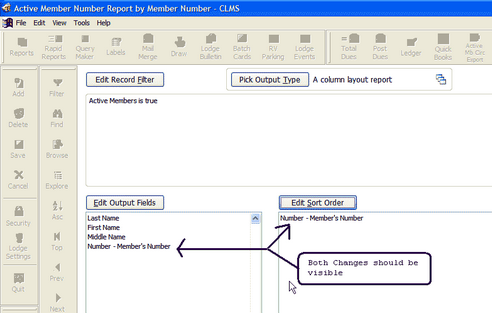
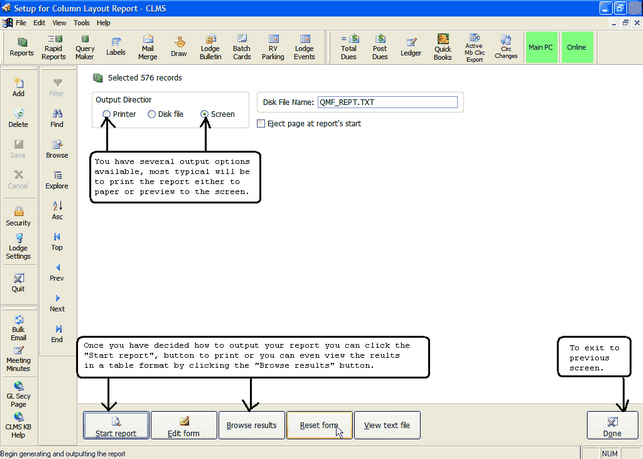
Notice that both changes will appear below the buttons. With the option "Browse query results" checked click the "Run Query" button to view the output options.
You will presented with several output options. You can choose to print or preview the report on the screen or choose the text file option. Once you have selected the type of output you want click the "Start report" button or the "Done" button when your ready to exit this screen.
Keep in mind that if you wish to create a text file for output you must already have the output type selected, otherwise you will get the default text output type. Review this link Pick Output Type to see more out other output types.
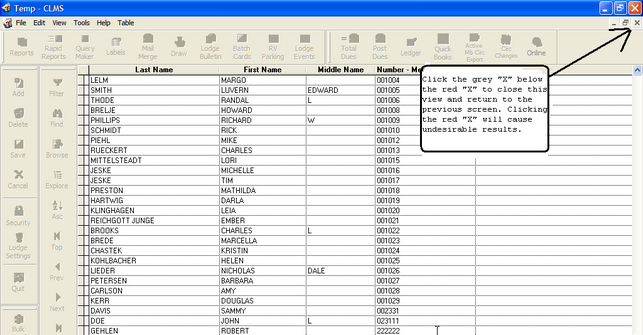
The results will be displayed in in a columned spreadsheet like format. You can click the grey "X" as demonstrated below to exit you will then be presented with some output options. Make sure you don't select the red "X" to exit this screen you will get an error message and CLMS may freeze up.
Step 9
See Also
Reference
Pick Output Type - How to change output types from various forms of text files spreadsheets and printed formats
Edit Record Filter - How to select the fields and their values for a particular query
Edit Output Fields - Selecting what fields to include in your output
Edit Sort Order - How output is to be sorted
Copying A Query and Customizing - An example of how to copy and customize a query.
Query Extraction Fields - See a list of fields and descriptions that can be added to your queries and reports
![]()
Suggestions or bug reports about the CLMS product or help can be emailed to CLMS Helpdesk.
© B.P.O. Elks of U.S.A. All rights reserved.
Page url: http://www.YOURSERVER.com/index.html?customizing_a_querymaker_query.htm